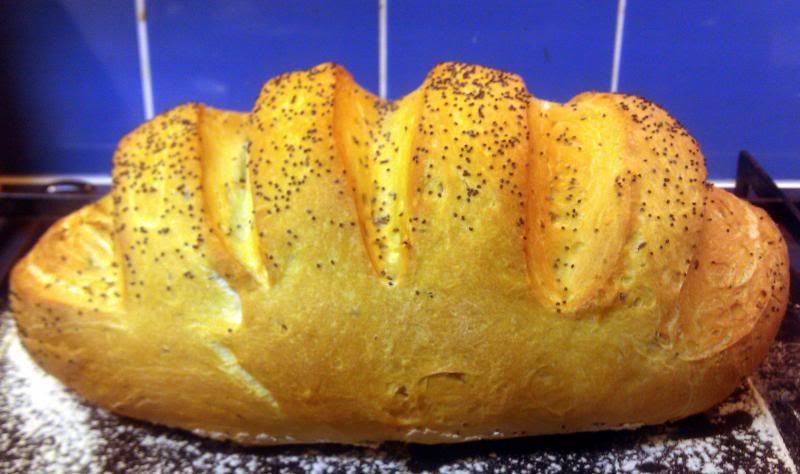
Baguettes in a home oven - success at last!

All about bread

Baguettes in a home oven - success at last!

Postby grisell » Sat Apr 28, 2012 9:46 am

After maybe fifty trials, I now think that I've got the baguettes just as good as they can get in a home oven. The solution lay in combining the two sources

http://modern-baking.com/bread_pastry/mb_imp_16706/

http://www.cookingforengineers.com/arti ... onstructed (Thank you for the link, DiggingDogFarm)

It is fully possible that the baking properties would benefit even more with sourdough, but I prefer baguettes with a 'fresh' taste. Please excuse me if the instructions are over-pedagogical. They were originally written for publication elsewhere.

Please note that the baguettes take eight hours to make, but the time can be split over two days.


Recipe for three baguettes of 35-40 cm in length

470 g wheat flour with high protein content (>11 %)
330 g cold water (around 10 deg C)
30 g cold water (around 10 deg C)
8 g salt (preferably sea salt)
4 g fresh yeast


Recommended equipment

Digital gram scale
Mixing machine
Baguette tray (mine is 38 cm long and has room for three baguettes. The amounts in this recipe are adapted to that tray).
Metal dough scraper
Razor blade or scalpel
Spray bottle with water

The instructions are in the captions below.


Image
Mix the flour and 330 grams of water for only 1-2 minutes in the machine on slow speed, or until barely mixed. Cover and let stand for ½-1 hour. (The picture shows before mixing)

Image
Add salt to the dough. Dissolve the yeast in 30 grams of water. Add to the dough (if the salt is added directly to the water and yeast, the yeast may die). Knead the dough in the machine on low speed for 2-3 minutes, or just until everything is thoroughly mixed. Don't knead for too long!

Image
Transfer the dough onto the baking table.

Image
At this stage, the dough looks more like a porridge or a thick batter.

Image
Flatten the dough with floured hands. With a light hand, the dough won't stick.

Image
With help of the floured scraper, fold the left side to the middle.

Image
- then the right side.

Image
- then the top and bottom. Flip so the seam faces the table. Let rise for 20 minutes. Repeat the folding, flipping and rising twice (that is three times in total).

Image
The dough now has a smooth and elastic structure.

Image
Cover with an upside-down large bowl (a towel is inexpedient since it sticks to the dough). Let rise until double in size (about three hours).

Image
After the first rising.

Image
Divide the dough in three loaves, roughly equal in size. Don't work the dough or change its shape! Let rest for 20 minutes to make the dough relax.


Image
Now comes the tricky part. Shape the pieces into baguettes with the help of the scraper, without stretching the dough or changing its structure.

Image
Work with a light hand and fast movements, so the dough doesn't stick. The loaves should be a little shorter than the tray.

Image
Carefully transfer the loaves to the greased baguette tray and sift some flour on top. Let rise for another two hours, uncovered, or until they doubled or tripled in size. (Alternatively, they can be refrigerated and get their second rise later, within 24 hours)


Image
After the second rising. They should be very well risen. Don't worry that they won't hold. If the instructions have been followed and the flour has ample protein, they will not collapse.

Image
The oven should be 260 C. Provide steam, e.g. with boiling water in a pan. I also put a cork in the oven's funnel to keep the steam.

Image
Make three incisions with a razor blade in the loaves and immediately move to the hot oven. The incisions should be shallow, only penetrating the outer dry crust that formed during the second rising. Reduce the temperature to 240 C and bake for 8 minutes, then reduce to 200 C, remove the water pan and bake for another 25 minutes. Baguettes must be thoroughly baked.


Image

Spray the baguettes with a little cold water and let them cool without covering.

Image
Don't cut in them until they have cooled completely. As seen in the picture, the porosity is almost perfect, with irregular bubbles and the crust is thin and crunchy. The baguettes will keep well for at least 24 hours. The best way to keep them is on the tray in room temperature, covered with a kitchen towel. Never put them into anything that is airtight, or the crust will immediately be spoiled!


Notes

* The quality and protein content of the flour is crucial. Ordinary wheat flour with 10 % protein can normally not be used. The protein content should be 11-13 percent. I use an excellent flour by the name of Manitoba Cream with 13 % protein.

* The yeast must be fresh baker's yeast. Dry yeast doesn't work well with cold water.

* Every ingredient should be exactly weighed.

* Gluten, which gives elasticity and structure to a dough, is normally produced by prolonged kneading. This gives a smooth end even texture which is convenient in factories and on store shelves, but that's not what we are after with baguettes. An artisan baguette should have an irregular structure, a thin crust and a delicate aroma of wheat. Therefore, baguette baking relies on another method to evoke gluten in the dough: autolyse and long fermentation by means of cold water together with a minimal amount of yeast. Thus it is important that the dough is given enough time to rise or it will collapse like a house of cards during the second rising. If the kitchen is hot, the dough should be moved to the refrigerator for a while so that it gets its total of six hours rising time.

* The water should be cold, but not ice cold. Directly from the tap is usually perfect (ca 10 C).

* It's probably possible to make well without a dough mixing machine, but it can be troublesome to knead such a loose dough.

* A special baguette tray to keep the shape is almost indispensable. The dough is so loose that it will float out if not supported on the sides.
André

I have a simple taste - I'm always satisfied with the best.
grisell
Registered Member
 
Posts: 3171
Joined: Sun Oct 04, 2009 6:17 pm
Location: Stockholm, Sweden

Postby salumi512 » Sat Apr 28, 2012 2:09 pm

I used a book entitled "The Bread Baker's Apprentice". It explains the process as much as the ingredients and ratios. Now I want to build a bread oven.
User avatar
salumi512
Registered Member
 
Posts: 318
Joined: Fri Jan 06, 2012 3:27 am
Location: Austin, TX

Postby wheels » Sat Apr 28, 2012 4:04 pm

They look good.

This is the method I used for ciabatta, which of course, this style of baguette quite resembles. I am surprised that the yeast is added with the salt, many recipes add it 30 mins or so later (sort of a 'second autolysis' stage).

Your crumb structure looks just right - any larger and your jam falls through the holes! :lol: :lol:

I love making 'craft' breads but have yet to find a way of fitting them into my lifestyle - I keep an active sourdough, but rarely use it for this reason. Regrettably, making anything that takes much longer than my standard loaf or rolls is confined to high days and holidays.

Phil
User avatar
wheels
Global Moderator
 
Posts: 12894
Joined: Sat Sep 02, 2006 4:29 pm
Location: Leicestershire, UK

Postby grisell » Sat Apr 28, 2012 5:13 pm

wheels wrote:They look good.

This is the method I used for ciabatta, which of course, this style of baguette quite resembles. I am surprised that the yeast is added with the salt, many recipes add it 30 mins or so later (sort of a 'second autolysis' stage).
[---]
Phil


Thank you. :)

Second autolysis, huh? Sounds interesting. Do you mean to add the salt first and the yeast last or the other way around?
André

I have a simple taste - I'm always satisfied with the best.
grisell
Registered Member
 
Posts: 3171
Joined: Sun Oct 04, 2009 6:17 pm
Location: Stockholm, Sweden

Postby wheels » Sat Apr 28, 2012 5:50 pm

The method I saw added the yeast, let that get going a bit and then added the salt. I thought that it was after the autolisation (?sp) However, on checking, it added the yeast at the start. I'm not sure whether that is a 'proper autolyse' though - that's normally just flour and water like yours. Therefore, I'd still be tempted to add it as a second stage (if you want to bother with it). Certainly, it seems to give the yeast a better start. This is one of those loaves:

http://www.wildyeastblog.com/2007/07/08 ... sourdough/

I think I first saw it on Dan Lepard's forum - a great place for all things bread:

http://www.danlepard.com/forum/

I've just looked at my blog and realised that I really must write more about bread. It fascinates me and amazes me in equal measure. To produce a nice light loaf with just flour, water and salt (as in sourdough) really gives me a buzz.

Phil
User avatar
wheels
Global Moderator
 
Posts: 12894
Joined: Sat Sep 02, 2006 4:29 pm
Location: Leicestershire, UK

Postby DiggingDogFarm » Sat Apr 28, 2012 5:54 pm

Beautiful crumb, looks awesome!


~Martin
User avatar
DiggingDogFarm
Registered Member
 
Posts: 446
Joined: Wed Jan 25, 2012 5:38 am
Location: Finger Lakes Region of New York State

Postby wheels » Sat Apr 28, 2012 6:26 pm

Quick tip: For very wet dough it can be easier to use a little oil instead of flour on your work surface.

Phil
User avatar
wheels
Global Moderator
 
Posts: 12894
Joined: Sat Sep 02, 2006 4:29 pm
Location: Leicestershire, UK

Postby mitchamus » Mon Apr 30, 2012 1:06 am

wheels wrote:Quick tip: For very wet dough it can be easier to use a little oil instead of flour on your work surface.

Phil


and use damp hands when handling - works for me anyway...
Australia - Where the Beef sausage is King.
mitchamus
Registered Member
 
Posts: 452
Joined: Wed Dec 03, 2008 10:50 pm
Location: Sydney/Snowy Mountains Australia

Postby homer » Mon Jun 11, 2012 8:29 pm

thats looks really impressive
will give it a go when i have some free time..fishing season starts this weekend so other half is happy as it will mean less time indoors baking and cooking :roll:
Other half moaned on about me finding new hobbies ..found this site..now she's sorry!!
User avatar
homer
Registered Member
 
Posts: 138
Joined: Fri Apr 15, 2011 5:00 pm
Location: London

dough kneading machine

Postby simhin » Sat Jun 30, 2012 4:49 pm

Can you give me any details on your kneading machine please?

cheers
simhin
Registered Member
 
Posts: 5
Joined: Tue Jun 26, 2012 2:52 pm

Re:

Postby ttx450 » Thu Mar 29, 2018 9:27 pm

After reading the thread and looking at your post I am ready to make some bread! You make rye starter?
I have some old rye flour in the freezer that a few years old might try to use it.

I use to keep living culture in the fridg, actually still have it in there. Use to use it in pizza when I was playing around with cracker crust.

wheels wrote:The method I saw added the yeast, let that get going a bit and then added the salt. I thought that it was after the autolisation (?sp) However, on checking, it added the yeast at the start. I'm not sure whether that is a 'proper autolyse' though - that's normally just flour and water like yours. Therefore, I'd still be tempted to add it as a second stage (if you want to bother with it). Certainly, it seems to give the yeast a better start. This is one of those loaves:

http://www.wildyeastblog.com/2007/07/08 ... sourdough/

I think I first saw it on Dan Lepard's forum - a great place for all things bread:

http://www.danlepard.com/forum/

I've just looked at my blog and realised that I really must write more about bread. It fascinates me and amazes me in equal measure. To produce a nice light loaf with just flour, water and salt (as in sourdough) really gives me a buzz.

Phil
ttx450
Registered Member
 
Posts: 52
Joined: Thu Oct 26, 2017 11:31 pm

Re: Baguettes in a home oven - success at last!

Postby wheels » Fri Mar 30, 2018 11:03 am

I use strong bread flour for starter. Mix 100g each of flour and de-chlorinated water - I use bottled spring water. Cover, but leave an opening for gas to escape, keep at room temp. After 24 hours throw half away and add 50g each of Bread flour and water. Repeat each day for 4 or 5 days. Use half of it to make bread. Use it about 5 - 6 hours after you've fed it.

It may smell beery - that's fine, it may get liquid on top - that's fine - just stir it in.

HTH

Phil
User avatar
wheels
Global Moderator
 
Posts: 12894
Joined: Sat Sep 02, 2006 4:29 pm
Location: Leicestershire, UK

Re: Baguettes in a home oven - success at last!

Postby ttx450 » Fri Mar 30, 2018 7:02 pm

thanks for sharing.. so no rye flour just high protein flour?

wheels wrote:I use strong bread flour for starter. Mix 100g each of flour and de-chlorinated water - I use bottled spring water. Cover, but leave an opening for gas to escape, keep at room temp. After 24 hours throw half away and add 50g each of Bread flour and water. Repeat each day for 4 or 5 days. Use half of it to make bread. Use it about 5 - 6 hours after you've fed it.

It may smell beery - that's fine, it may get liquid on top - that's fine - just stir it in.

HTH

Phil
ttx450
Registered Member
 
Posts: 52
Joined: Thu Oct 26, 2017 11:31 pm

Re: Baguettes in a home oven - success at last!

Postby wheels » Sat Mar 31, 2018 4:04 pm

ttx450 wrote:thanks for sharing.. so no rye flour just high protein flour?[


That's what I do, but rye would be a good addition, particularly if you're making wholemeal/malt bread.

Phil
User avatar
wheels
Global Moderator
 
Posts: 12894
Joined: Sat Sep 02, 2006 4:29 pm
Location: Leicestershire, UK

Re: Baguettes in a home oven - success at last!

Postby ttx450 » Sat Mar 31, 2018 7:51 pm

thanks.. will try a starter with just bread flour. Need to find a place warm enough to get it going, my house is still on the cool side. I made and tote with light bulbs, might pull it out and use that.

wheels wrote:
ttx450 wrote:thanks for sharing.. so no rye flour just high protein flour?[


That's what I do, but rye would be a good addition, particularly if you're making wholemeal/malt bread.

Phil
ttx450
Registered Member
 
Posts: 52
Joined: Thu Oct 26, 2017 11:31 pm

Next

Return to Bread Making

Who is online

Users browsing this forum: No registered users and 1 guest